Showing posts with label Craft Room. Show all posts

Friday, March 5, 2010

Blogswap with MaryJanes and Galoshes

I'm so excited to be doing this blog swap with Taylor, from MaryJanes and Galoshes.  Everything on her blog is absolutely amazing, and this tutorial she is sharing is no different!  Here she is....


Hello Get Your Craft On readers!  And a big thank you to Lynette for asking me to be here today, I'm so excited to be crafting with you all.  First off, I'm Taylor from MaryJanes and Galoshes.  I'm a mother of three under three, about to celebrate my 7 year wedding anniversary to my high school sweetheart, and an artist all my life.  So stop on over sometime and say hello, I'd love to see you again.

Anyway, today we are going to make these adorable photo pencils!

 
That's my adorable little niece.  She's sassy and spunky and a big ball of fun.  
What you need-
An adorable subject and three laser copies of the photo on REGULAR PRINTER PAPER (don't use a photo with too much detail, mine is about as small as your going to want to go) you can use a photo of anything you like, doesn't have to be a portrait.
mod podge
paint brush
paper cutter
set of 12 pencils


If you don't have access to a laser printer you can use double stick tape rather than mod podge, but mod podge allows for the pencil to be sharpened without the picture getting all ripped up in the sharpener.

Cut your photos up into 1.25 inch strips, make sure you keep them in order.  You can stack the like strips into one pile.  Separate your pencils into groups of three.

 
 Each stack of three (three of the same strips) will wrap around a set of three pencils.  If your photo has a small face (like mine) take one of your outside pencils, print a 4th picture, and cut a 1.25 inch strip with the center of the face.  


On a protected surface, cover the back of each strip with mod podge and wrap it around each pencil.  Make sure the edges are sealed with a little bit of mod podge around the edges.  
Continue until all your photos are covered.

 
Roll each pencil until your picture appears! 

Hope you had fun today!  Don't be a stranger.


Sincerely,
Taylor Ballweg
www.MaryJanesandGaloshes.com
Tayloredarts.etsy.com

Wednesday, December 16, 2009

What a guy!

My husband rocks!  Really, he does.  He puts me to shame with all the cooking, cleaning, laundry, and everything else he does!  I came home from a fun girl's night Christmas party last night 
and found this:

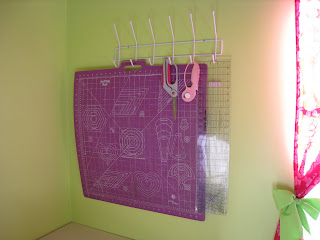
I bought this hangy thingie at Target and he hung it up for me...I love it!  It's perfect to hang all my rotary cutting tools and scissors up there.  This way I can clean up my table when I need to work on something that doesn't use the rotary mat.  Awesome!!! 
He also did this:

Do you know what it is?  It's a super bright florescent light in my fabric closet!   Now I can see all of my fabric better in the light!   Aaaahhhhh....fabric.


Have I told you before that my sewing room is my FAVORITE room in the house?   Well, it is!!!  Thanks hubby for making it 
even better!!

Tuesday, September 15, 2009

Rooty "TUTE" Tuesday - Pen Holder

Here is a super simple and cheap way to keep all your pens and pencils in one place! The sky's the limit with this, you can make it as simple or fancy as you wish!
Here's how to do it:


Pen Holder TutorialMaterials Needed: juice tub container (like crystal light), Mod Podge, brushes, paper, ribbon

1.) Measure Juice container (or whatever container you want to use) and cut paper to that size.
2.) With brush ( I use these cheap foam ones ), spread thin layer of Mod Podge on back of paper. If you can see the juice label through the paper, either try to remove it or put one more layer of plain white paper on the container first...like this:


3.) Then paint thin layer of Mod Podge on back of decorative paper and carefully wrap paper around container.
4.) Mod Podge one coat over the decorative paper. Let dry 20-30 mins. Coat container 1-2 more times, letting dry in between.
5.) With hot glue gun, glue ribbon on top and bottom of paper. You may want to use Fray Check at the ends to prevent fraying.

6.) Decorate it more if you want...or leave it how it is! Put some pens and pencils in there and put it on your desk to look pretty!

***Stay tuned for next weeks Rooty "TUTE" Tuesday, we will be
featured on a totally amazing blog!

Thursday, August 13, 2009

Tutorial - Sewing Machine Quilt


This is a fun little quilting project with quick results! It's your sewing machine's very own quilt! Put your sewing machine on top of it and have all your sewing tools right there for you in the handy little pockets! I like to keep my snippy scissors (is there a real name for those?), my seam ripper, and my little screwdriver in there...you never know when you might need one of those! So, here's how you make it:

Materials:
fabric for main quilt piece (cotton or flannel) - 1/2 yard
fabric for pocket - 18"x8"
fabric for binding
batting or fleece - 18"x20" and 18"x4"
spray baste or pins
sewing tools: machine, thread, iron, etc.

*note: the finished sewing machine quilt is approximately 18"x20", which works perfect for my sewing machine. Check your sewing machine before making this to make sure those dimensions work for you!


1.) Cut out pieces:
*main piece - cut (2) 18"x20"
*pocket - cut (1) 18"x8"
*batting/fleece - cut (1) 18"x20" and (1) 18"x4"


2.) Using basting spray (you can use pins if you want), baste together the main quilt piece. Also use the spray for the pocket.
Fold the pocket piece in half lengthwise and iron. Put 18"x4" batting/fleece piece in between and baste in place.
Baste wrong side of main pieces to both sides of batting/fleece piece.


3.) Quilt the main piece. Then quilt the pocket. I quilted a basic grid, but you can do whatever you want here! Stippling or some cute free motion quilting would be fun!

Here are both pieces all quilted.


4.) Make the binding. With the fabric you have for the binding, cut it into 2 1/2" strips (2 strips). Make a binding...I use this method, but you can do it differently if you want. If you don't want to do any hand sewing, you can make a double fold binding and machine sew it on.
Sew binding on the top of pocket.


5.) Once the binding is sewn on the top of the pocket, place the pocket in place on the little quilt. Then sew close to the edge around the bottom and sides of the pocket to keep it in place on the quilt (this stitching will be hidden once we bind the whole thing).

Now sew vertical lines on the pocket to make smaller pocket sections. You can make these however big/small you want. You may want to make one big enough for your scissors! Mine are 5", 5", 8". Make sure to back-stitch a few times right before the binding at the top of the pocket.


6.) You're almost done! Use the rest of the binding to sew it around the entire quilt. Again, I like to sew it on with a machine and miter the corners and then flip the binding over to the back to sew on by hand.

You're done!!! Look how cute and comfy your sewing machine looks! Happy Sewing!!!


Wednesday, July 22, 2009

My Happy Place

When I think about going to my "happy place"....this is it:

My sewing room! It's basically done, although I have a few decorating ideas in my head I would still like to try to liven up the walls a little.....as though fluorescent green isn't lively enough :)

This is the main wall, with my serger, sewing machine, and cutting table.
Here is some of my "decorating"...some SEW letters that I mod podged.
My sewing machine! Nothing special, but I like it.
My sewing machine has it's own little quilt...complete with pockets for all my must haves while sewing.
My window and ironing corner. I have my "To Do" list and "Wish List" on my magnet board...they are very long.
The curtains were made from fabric I found in my husband's grandma's old scary cellar. She gave it to me...all 10 yards of it...and I LOVE IT!!!
My closet! Lots of fabric...
....and more fabric!!!!
Another view of the closet.
My IKEA shelves and of course I need some tunes while I work.
Okay, I admit...maybe I've gone too far. I just think it's fun to have everything match the decor.
The fan!
Well, thanks for letting me show you around my room...come again!!

Monday, June 8, 2009

More sneak peaks of my new sewing room!

Maybe these are more than just sneak peaks...but here are some more pictures of my sewing room, it's really coming along! As you can see I have glowstick green walls (the color is actually called "lime mousse") and I love it! I've been having fun with the mod-podge again and used it on this cute desk that will be home for my serger. I got the desk on craigslist for $15 and gave it a fresh coat of paint and a pretty drawer and voila! I also made a snazy new cover for my ironing board. If you haven't picked up on the color scheme for my room yet it is ANYTHING CHEERY AND BRIGHT!